Installing solar wall lights is one of the simplest and most efficient means of lighting your outdoor areas and saving on electricity expenses. Whether you want to upgrade your garden, beef up home security, or just provide ambiance on a balcony, solar wall lights are a brilliant and eco-friendly option.
Here, we'll guide you through installing these lights like an expert, step by step.
Why Choose Solar Wall Lights?
Before diving into installing, it's nice to know why solar wall lights are an excellent option:
No cables needed, operates independently of the electrical grid; Environmentally friendly – runs on renewable solar power.
Saves money, no electricity bills, Low upkeep, made to withstand outdoor conditions
It automatically turns on at sunset and off at sunrise. Now let's discuss how to install them correctly.
Step 1: Select the Right Spot
Performance is sunlight-dependent. Choose a wall with a minimum of 6–8 hours of direct sunshine per day. Don't try to put them in shaded spots such as under trees, balconies, or roofs. Typical spots include:
Boundary walls and entry gates, Exterior garage/staircase walls, Terrace parapet / roofed balcony walls, Garden fences and walls
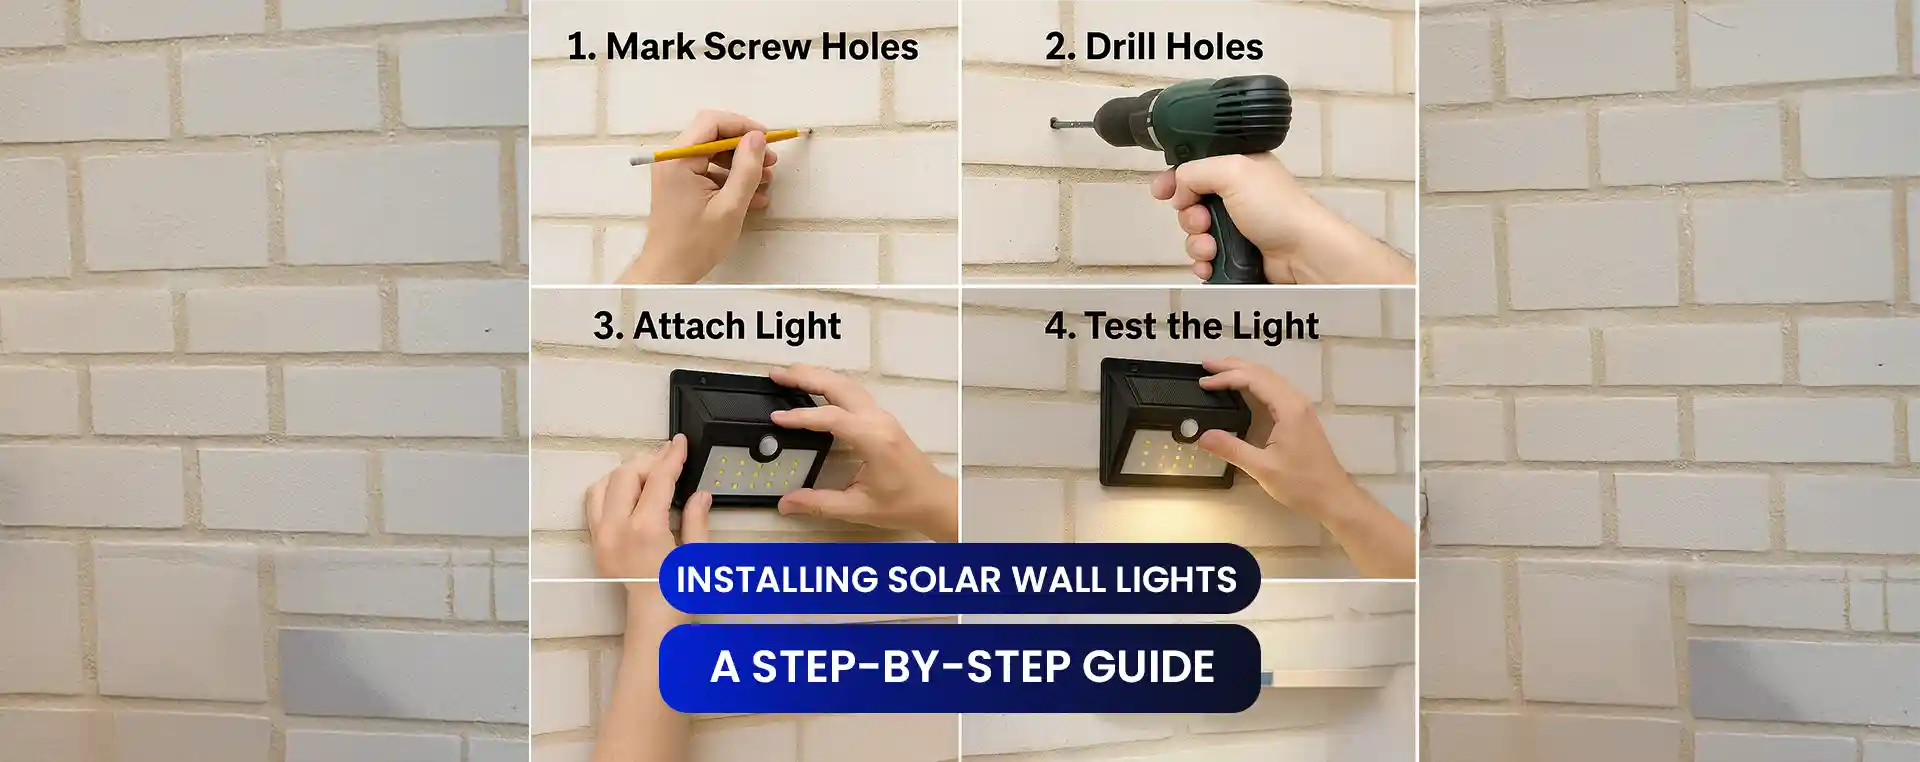
Step 2: Identify Mounting Points
After choosing the wall location:
Place the light at the desired position, where you plan to install it. Use a pencil to mark the screw holes through the mounting bracket.
Ensure the light is leveled horizontally using a scale or level tool. If your model comes with a template sheet, use that for easy marking.
Step 3: Drill the Holes
Using a power drill: Drill into the marked points on the wall.
For concrete or brick walls, insert plastic anchors to secure the screws properly.
If the wall is made of wood, you can drive screws into it.
Step 4: Attach the Light
Place the mounting bracket of the light on top of the holes drilled. Attach the light firmly to the wall using the screws provided.
Ensure that the light is solidly attached and doesn't move when there is heavy wind or rain.
For adhesive designs (typical for small lights on glass or tile), just peel and stick, but on a clean and dry surface.
Step 5: Turn ON and Test the Light
Most solar-powered wall lights have a power or mode switch along the bottom or rear.
Flip the switch ON.
Choose your desired lighting mode (constant, dim + bright movement, etc.).
Cover the panel with your hand or test after dark to see if it comes on.
Charge the light in direct sunlight for 1–2 days prior to anticipating maximum performance.
Maintenance Tips
Wipe clean the solar panel every month to get rid of dust or bird droppings.
Don't cut off sunlight by putting something in the way .
If the light gets weaker with age, think about replacing the rechargeable battery.
Why Hardoll Solar Wall Lights?
Hardoll provides a broad range of strong, sophisticated, and efficient solar wall lights that are suitable for Indian weather. Dual color mode, motion detection, remote control, and IP65 water resistance are some of the features of Hardoll lights that are simple to install and long-lasting.
For a bright and carefree experience, pick Hardoll solar wall lights. Stylish, smart, and solar-powered!
1 comment
Arrrow
Me sirvió mucho